This article is 2nd part of Apache High Availability Cluster Configuration series; refer to below links to read other parts:
- Part 1: Basic Concepts of High Availability Cluster
- Part 2: Apache High Availability LAB Initial Setup & Configuration
- Part 3: iSCSI Storage Server & Initiator Configuration
- Part 4: Configure Apache & Cluster Resources for High Availability
Part 2: Apache High Availability LAB Initial Setup & Configuration
After understand Basic Concept of High Availability Clustering on Linux, it’s clear that RHEL 7 / CentOS 7 uses Pacemaker as cluster software. So in this guide we will be configuring highly available Apache Web Server on three physical nodes using Pacemaker and Corosync. As explained in previous article a fail-over cluster depends on different components, so that we need to configure filesystem using iSCSI storage server on another Linux machine and then we will use that as a shared storage over the network.
Cluster Infrastructure in Diagram:
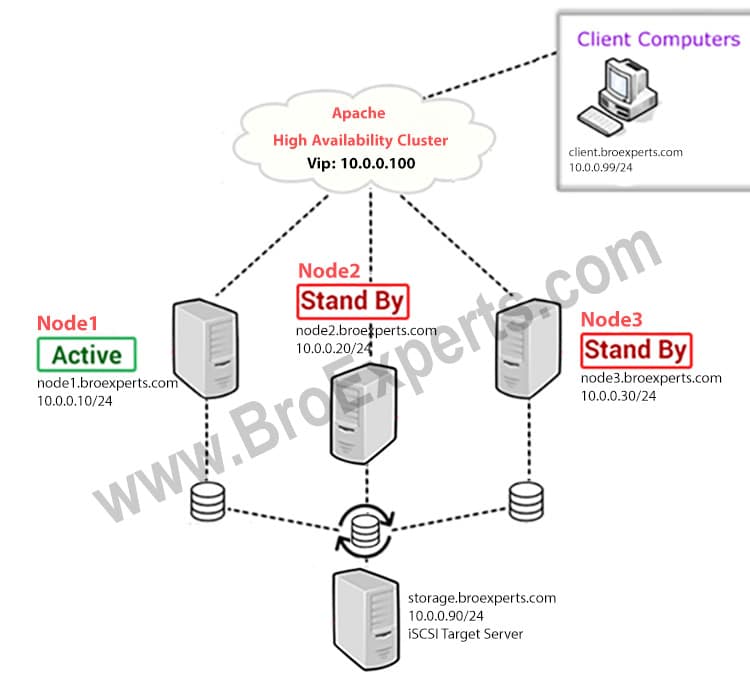
Diagram Explained:
As shown in the diagram, I will use total three Virtual Machines, where node1, node2 and node3 will act as active and standby hosts in cluster, and shared storage will be used from storage.broexperts.com host. All hosts running freshly installed copy of 64-bit minimal install CentOS 7 Operating System.
LAB Setup:
Cluster Nodes Details
node1.broexperts.com 10.0.0.10/24
node2.broexperts.com 10.0.0.20/24
node3.broexperts.com 10.0.0.30/24
Virtual IP
10.0.0.100/24
iSCSI Storage Server
storage.broexperts.com 10.0.0.90/24
Client
client.broexperts.com 10.0.0.99/24 (Win-7 client for testing)
Initial Setup:
I assume that you have done all initial setup; CentOS 7 installed and network is setup with fully qualified hostnames. Before you start installation make sure everything is setup accordingly.
Step 1: Edit Host File
Update /etc/hosts file for local name resolution as showing below
vi /etc/hosts
Copy blow lines and paste into /etc/hosts/ file.
127.0.0.1   localhost
10.0.0.10   node1 node1.broexperts.com
10.0.0.20   node2 node2.broexperts.com
10.0.0.30   node3 node3.broexperts.com
10.0.0.90   storage storage.broexperts.com
10.0.0.99   client  client.broexperts.com
Repeat same steps on all nodes including storage server
Step 2: Remove NetworkManager
NetworkManager must be removed or disabled; to avoid any automated network configuration for cluster nodes. Enter following commands on both nodes including storage server to remove NetworkManager completely.
yum remove NetworkManager –y
Restart network service
systemctl restart network